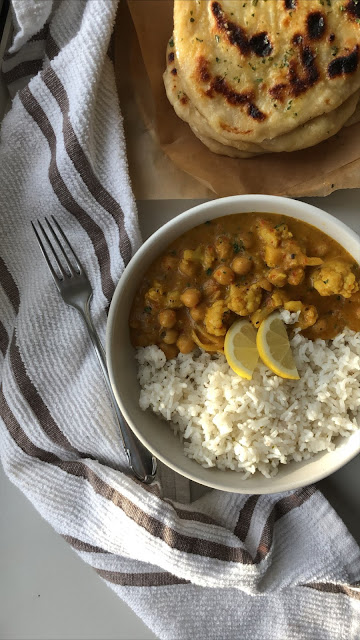
Golden Chickpea and Cauliflower Curry
So this curry is wonderfully aromatic, the colour is stunning and it's even healthy-ish! What's not to love?
I paired it with my fluffy coconut rice and those gorgeous buttery homemade flat breads! They are a two main-ingredient affair (the garlic and herbs being optional) and are literally the easiest kind of bread that you will ever make, ever. Find the recipe here.
This curry is one of those recipes that you wanna keep on tab for those stormy winter evenings - or if you live in Swansea like me, it'll be just about every other day during winter!
*Before I get into the recipe, please note that the base of this curry starts off with homemade red curry paste! If you haven't made one already, you can find the recipe down below - or sub it for some shop bought paste (I can't promise you it will taste as good as the homemade one though!)
INGREDIENTS:
2 tbsp coconut or sunflower oil
1/2 a large white onion, thinly sliced
2 garlic cloves, finely chopped
1 chunk of ginger, grated
3 heaped tbsp homemade red curry paste*
1 heaped tbsp curry powder
1 mug full of veggie or chicken stock
1 can of coconut milk
a good handful of cauliflower florets (frozen or fresh will do)
1/2 chicken or veggie stock pot
1 bay leaf
1 tsp cumin, tumeric and ground ginger, dried corriander
1-2 tsp chilli flakes
salt
pepper
1 tsp cornflower (to thicken the curry)
serves: 5
freezer friendly: yes

1. Heat the oil in a heavy bottomed saucepan over a medium heat, when it's hot - add in the onions and let them fry for 3 mins or so. Use a wooden spoon to keep 'em moving, you want them to be soft and gently browning. Add in the garlic and ginger, turn the heat down a bit and let them fry for about 2 mins.
2. Add in the curry paste and let that warm up until nice and fragrant. Keep stirring, we don't want our curry paste to burn!
3. Pour in your prepared stock and the coconut milk. Chuck in the cauliflower and chickpeas, half the stock pot, bay leaf and spices. Give it a good stir and put the lid on. Go put your feet up somewhere and come back in 12.
4. The curry should be gently simmering, if it isn't - turn the heat up a bit - give it a stir to stop the bottom sticking and put the lid on, check on it in another 10.
5. When you come back to it, the curry should have reduced a bit and have a lovely golden hue. At this point, you wanna do a little taste test! Not spicy enough? Add some more chilli, not salty enough? Add some salt, and add some pepper for a beautiful warmth as it pairs great with the ginger.
6. Last thing to do is to thicken the curry slightly. Put a teaspoon of cornflour in a bowl and add enough teaspoons of curry to the bowl to make a cornflowery paste. This is your thickener. Add it back to the curry and stir, turn the heat down to medium-low and let it simmer until the curry is to your desired consistency. If you want it extra thick you can do another teaspoon of cornflour paste!
7. Serve with fluffy rice, lots of flat bread, a squeeze of lemon and a sprinkling of corriander!
------------------
Red Curry Paste
Based on MinimalistBaker recipe
INGREDIENTS:
1 large red pepper, roughly chopped
1/2 white onion
2-4 red chillies (de-seed depending on heat tolerance)
1 stalk of lemongrass, chopped (root discarded)
1 thumb sized piece of ginger, peeled and roughly chopped
3 garlic cloves
1 tsp ground cumin
1 tbsp ground tumeric
1/2 tsp black pepper
1/2 tsp salt
1/2 lemon, juiced
1 lime, zested and juiced
2 tbsp coconut oil (any oil will do really)
1 1/2 tsp dark brown sugar
METHOD
1. Add all ingredients to a food processor or blender and whizz until you've got a nice thick, smooth-ish paste. It won't be completely smooth, you'll still have texture, but texture is good!
2. Make sure to taste to adjust salt, spice or sweet to your liking.
3. Store in the fridge for up to 10 days or freeze on the day you make it in an ice cub tray for up to 1 month.
P.S. let me know how it goes people! I'd love to hear if you tweak things and how you make it your own x
all the love!
♡


Comments
Post a Comment